Saturday 10 January 2015

Fukien Tea Tree - New growth with Mould/Scale/Bugs?

It has been a little while since my last update on the reason I set up this blog - my new Fukien Tea Tree. Much has changed since the very first post and the growbox which is now stands in is fully fitted with everything the tree needs to grow well.  However, as with all things there are hiccups along the way which I have experienced and am still trying to sort.

Growbox complete with lighting and temperature/humidity gauge.

Lets start with the good news. My Fukien Tea Tree has experienced  a lot of new growth since sitting under its new lighting system.  Many new buds have popped up all over the tree and new small leaves are starting to grow bigger and bigger.  This was a huge sigh of relieve considering the tree had a few days of moving locations.  Something must be right if it is starting to grow.

Growbox with lid open
The problem that I am experiencing is something that I am struggling to diagnose myself (so any help will be great).  The tree has started to shown signs of what looks like white fluffy mould.  At first I thought it was just a one off or a bit of dust. I brushed it off and then cut off the leaves it was on just to be cautious.  Unfortunately this 'mould' has continued to reappear on the trunk, branches and leaves as well as on the cuttings of the tree.

Fukien Tea Tree cuttings with fuzzy mould.

I am hoping it is mould. Today my new temperature gauge and humidity gauge arrived and the temperature seems to be sitting at 22.5 degrees centigrade. The humidity on the other hand is way up in the 80%. I know that the Fukien Tea Tree needs humidity over 25% but 80%+ seems extremely high and in one way backs up the mould idea.  I am now going to work on bringing the humidity down to around 50% which seems like a better level for the humidity for the tree.

Fukien Tea Tree Bonsai with new growth and mould evident.
The other causes of this 'mould' are much more worrying. For this 'mould' may not be mould. It could be scale, spider mites or some other small critter.  If their is no improvement on the tree when I lower the humidity then I will have to look into these options and treat the tree accordingly.  Any of these can be very serious so I am slightly worried. 

In other news I have now planted three lemon seeds that had sprouted using the techniques mentioned in a previous post.  Along with this I have also planted a handful of sprouting kiwi seeds. Hopefully I can get some positive results out of both of these.

Three lemon seeds planted. Two on the right, one on the left.


Tuesday 6 January 2015

Lemon and Kiwi Seeds Germination

As you will know from reading the previous posts; in the growbox I have a pot with four lemon seeds and one with a grapefruit seed.  These have been in the pot for coming up to two weeks but I am yet to have seen any changes or shoots come up out of the soil.  Now, I am not too concerned as I also have some other seed projects going on trying a different technique.

Techniques

So for the seeds that I have just planted straight into soil I simply took them out of the fruits, cleaned them of any bits of fruit, kept them moist and planted them. As I said, so far nothing have sprouted but this is expected. The lemon seeds and I now presume the grapefruit seed as well, are actually not what you see when you cut into a lemon. The actual seeds are covered in a  hard outer shell which for the potted ones I have left on. This takes longer for the seed to break down so sprouting can expect to take longer.

The other technique I have used is from a man call Mitchel Boyle who I have linked to before. He has a great set of YouTube videos on how to get seeds to germinate and sprout. You can see these here: https://www.youtube.com/watch?v=57XoFG0QuMI.  As you can see from watching the video, he encourages you to carefully peel off the outer coating of the lemon seed to reveal the actual brown seed. If you then cover this is a paper towel and dampen it to store in a warm place you will see quicken the time it takes for the seed to sprout.  Now I cannot see what is going on underneath the surface of my potted seeds but I have three seeds sprouting from using Mitchell's technique as you can see below. I am going to leave these a bit longer before planting them.

Lemon Seed Shooting

Two Lemon Seeds Clearly Sprouting

The above pictures are very promising for me. I will leave it still a few more days before planting and go from there.  I am working out where best to place them in terms of what pots etc.

Kiwi Seeds

For the Kiwi Seeds I used a rather different but similar technique.If you have ever seen Kiwi seeds you will know they are so so small and tiny.  There is no outer coating and in one Kiwi there are lots.  It is best to get as many as you can. Wipe away any juice from the Kiwi fruit and then store them in a glass of water in a warm place for a few days.  Once you have done this you can follow the same technique for the lemon seeds. Put them in a damp kitchen towel in a warm place and they will start to open.  These have been slower than I expected but I am starting to get a few open. I have taken a  picture but it may be hard to see due to their size.

If you look closely enough you will see the top central one staring to open.

I believe these will need to be left even longer than the lemon seeds before I start to plant them. I am very excited about these but again time will tell on how successful they are.  I am planning an update on the Bonsai Tree, cuttings and growbox in the next few days. I have just received my brand new bright cool daylight lights, so a full update is due.

Monday 5 January 2015

Side Projects

 Herbs

Yes. A Bonsai tree is not the only thing I got for Christmas. I also received two silver larger pots that contained everything you need to start growing your own herbs year round.  Always a bit sceptical of these 'grow your own' pots followed the instructions and expected nothing to come of it. Whether anything would grow or not is another question but again I hoped I could manage these small herbs.

The herb pots I received were for Parsley and Chives and doing some minor research these should grow easily in my room.  I am now where I will be based for the next 6 months and have my Bonsai Tree and Growbox on one side of the room and my side projects on a windowsill which unfortunately does not get a great amount of sunlight. Despite this I have had some excellent results already from my herbs.  Initially i saw one or two sprouts in both pots after just only 6 days of planting the seeds and now each day sees huge improvements which can be seen from the photos below. This can be particularly seen in the Parsley.

Chives on 4th January 2015

Chives a day later on 5th January 2015

Parsley on 4th January 2015
Parsley a day later on 5th January 2015


As you can see there has been some excellent growth overall in just a few weeks. Both lots of seeds were planted initially on Christmas Day and I am hoping to see the continued growth over the next few weeks before eventually being able to harvest the herbs to use in cooking.

Cacti

This time last year I was in a similar but different position. I had not got any for Christmas I had got some money that I decided to go out and spend on a three cacti. All different species and of different shapes and sizes. A year later and I could not have guessed what would have happened.  It is important to note I am not sure what each type is so if anyone knows, please leave a comment with any information on growing conditions etc. Results for the three cacti I have have been mixed. With one flourishing, one dieing and one seemingly staying exactly the same.

The dead one. Not quite sure what happened :(

The non-changer. This is exactly how it looked last year.

The lively one. The whole top section is completely new growth and has nearly doubled in height the overall size of the Cactus.

So these are the side projects I have going on at this time. I am planning to use the pot of the dead cactus for some other seeds/cuttings from whatever grows from the growbox. We will see. Stay tuned for further updates on the Bonsai Tree, Grow Box which now has a homemade lighting frame and everything else!!

Friday 2 January 2015

Bonsai Growbox 2.0

For those of you have read my previous posts you will be aware of my recent acquisition of a Fukien Bonsai Tree.  You will have also read how that one Bonsai Tree turned into multiple pots of cuttings and seeds of a wider range of trees, all housed in the new Grow Box I purchased.  As you can see below, the grow box is quite simple. Made of wood and hard plastic for the windows it opens up by lifting the top half backwards. 

Original Grow Box With Open Lid

As you can see, it is nothing special.  I brought the grow box for my Bonsai originally so I can keep the temperature warmer and humidity high.  This never happened.  I monitored the   temperature for the first few days and nights and it was as cold as normal room temperature dropping below 15 degrees centigrade often. This was a huge concern as well as the fact that during winter in the UK the plant would not be getting enough light.

I found an old desk lamp and directed into the grow box (this is the wrong type of light to use but I will get to that).  The good thing was that the temperature around 20 degrees centigrade when the light was on.  Humidity was still an issue and so was the temperature over night.  Then I had a thought.  Now this is not conventional for Bonsai or for grow boxes and a lot of people will probably disagree but it started me on a project to continually improve the conditions for my Bonsai, cuttings and seeds. 

So what was my vision? I needed to make the grow box, warmer, more humid and set up the right lighting.  For those of you who know much about Bonsai, sometimes when they are being presented they have  layer of moss on the soil to add to the art.  All of my pots are in humidity trays and were sat on paper inside the box. My idea was to replace this paper with moss.  I believe this would increase the temperature and humidity.

The next day, I emptied the grow box and and set about my vision for the bottom of the grow box.  I layed down a plastic sheet to cover the entire bottom of the box. I then cut up 4 pieces of wood not much higher or wider than 1cm. Then lay another sheet of plastic down and overlapping onto the wood blocks,  The plastic sheeting was so now water damaged the wood at the bottom of the box. The wood blocks gave me a bowl where I could the moss and eventually stand the pots on. I put a thin layer of soil down and watered it so it was damp.

Now for the moss.  I was never going to be able to find a piece of Moss instantly to cover the whole bottom of the box. So I went outside found some moss and placed it in a small pot. I watered it heavily and covered it with clingfilm to raise the humidity.  This is now growing new bits of moss and eventually will cover the whole of the bottom of the grow box. For now the pots sit in their humidity trays on the soil. This has already increased the humidity and temperature a lot and mist and moisture now sit on the windows,

The other issue I knew I had was lighting.  This is a real pain. The UK winter consists of very few hours of sunlight meaning I was looking into artificial light for the trees.  Now this is one confusing large area with lighting systems costing up to and above £1000. Considering I purchased the Grow Box for £7.5 there was no way I was going to or could afford a lighting system for that much.  After much confusion, buying two wrong bulbs for £12 and then being unable to find a holder for it I have now ordered and am awaiting delivery on my two new lights.  These will be positioned behind the grow box with one light for each side. 

So what Bonsai light d I go for? I am thinking of doing a whole section on this so I will keep it short. I purchased two 24W Cool Daylight 6400K Phillips CFL lights.  This will be held in place by two holders for their E27 fit (hopefully).  So why these lights? Between those available a smaller compact CFL light was most practical. I had looked at LED lights and seen favourable reviews but was unable to find the holder I would need for this. Anyone researching the same will know that indoor plants and trees generally need a colour light of either cool white or cool daylight with a temperature above 5000K - NOTE: This will vary from plant to pant and tree to tree - Make sure you research what is best for yours before purchasing anything. The lighting system should be with me within a couple of days so I am yet to see how this will work, effect humidity and temperature but it is something to look forward to.

I made one other adjustment to the grow box which is looking more and more like a terrarium everyday - which technically I guess a grow box is anyway. Again this is something many will say is wrong but at this time it is what I can get my hands on and afford.  I have fashioned two 4 bits of cardboard covered in two layer of kitchen foil and slotted these into the side window panels.  The idea behind this is to reflect any escaping light back in, onto the plants. I am hoping it also reinforces the side windows and lets less heat escape.

The results so far are very promising. The Bonsai is looking very green and super healthy.  The temperature does not drop below 18 degrees centigrade and lights bounces around the grow box.  I am not done though.  The new lighting system is still to be added and I also have purchased a temperature/humidity gauge to control these better.  Hopefully things stay well and when I have updates and the lights are added I will write a new post.

Here are some photos of Grow Box 2.0.

Bonsai Grow Box showing the normal desk lamp and humidity with soil base.
The right hand side of the grow box with the temperature gauge.

Bonsai Grow Box with light reflectors on the side.


Thursday 1 January 2015

The Bonsai Bug - How One Fukien Tea Tree Bonsai Turned into a Growbox with Six Pots

Its been a week to the day that I got my very first Bonsai Tree - the Fukien Tea Tree. It now sits happily in its grow box that I purchased and as of yet no problems have been encountered. Well, there was one slight problem which I am going to call 'The Bonsai Bug'.  This is no animal or little critter and can be experienced with any interest or hobby. Simply put, one Bonsai was not enough.  So a week later my considerably average grow box has undergone a lot of changes and my Bonsai now sites in there with 6 other pots - with more planned.

The question is why? Well anyone who knows Bonsai will know it takes a long time to achieve what you want to with a Bonsai. They are very slow growing and the wait (even a short time like a week) can feel extremely long with very few changes.  Step in my great idea.  It started when I read that I should prune my Bonsai after getting it. Not heavily but enough to start getting it used to pruning and also to encourage growth.  Not really knowing what I was doing I took off three small 'twigs' with my new scissors and put them to one side.  My Bonsai did not really look any different but I felt like I had accomplished something despite the look of horror on my parents face that I was cutting the gift they got me.

When deciding what branches to take off something caught my eye. A small round sphere like object not much different from a ball bearing half encased in something. To my surprise it seemed to have been left over from when the tree last flowered and fruited.  This started the cogs turning. I had a few empty pots, the grow box was spacious. Why don''t I plant the seed (if that's what it was) and see if it sprouted. 

That's exactly what I did. I purchased some Bonsai soil, prepared it and the pot and planted the little seed.  Now, it may not have been a seed but only time will tell. I am yet to find out how long it would take to sprout if it was a seed.  A week a later and I still stare at the small pot of soil wondering if anything is going on under the surface.

There's more you say?

Yes. I couldn't stop there. seriously, be careful if you get involved with Bonsai, they are extremely obsessive for something that requires a lot of patience and can see very little results initially. With my seed and Bonsai happily set in their pots I searched the Internet to see what else I could do.  Well, it was easy now. Remember those cuttings I took for the first few cuts of the tree? Three cuttings, three new pots and potentially/hopefully there will be three new Fukien Trees I can start from scratch.

Here is where the story has taken a turn for the worst - maybe.  Each cutting was wooden and had shoots coming off of it with 6-8  leaves on each.  Many of these leaves have started to droop. In my reading, I have learn t to cut this when this happens to again encourage new growth and not waste the trees energy on old shoots. On one cutting there was one a very new young shoot that still looks to be doing well so its not all doom and gloom. Time again will tell as to whether these will take.

Okay, so you have one 5 year old Bonsai, one newly planted 'seed' and three cuttings - that's a good start. Not for me. Researching everything I could once again about Bonsai I had stumbled across what some would say is a Bonsai grey spot.  Fruiting Bonsai. Bonsai are typically small leafed plants (one reason for this is that they are easier to manage).  Real fruit trees often have very large leaves and due to this dwarf versions have been introduced. There are some Bonsai fruit trees that work very well.

However, I cannot resist a challenge and trying something completely new and different.  A fond eater of lemon and kiwi I looked into how to start growing them from seed. I know I can grow them Bonsai style but getting them to grow initially could be tough.  I found a great guide on YouTube from a man called Mitchell Boyell: (https://www.youtube.com/watch?v=57XoFG0QuMI) on how to germinate lemon seeds quickly (he also has guides for kiwi seeds and much more). With that in mind I did exactly what he said and I currently have lemon seeds, which have been taken from a super market lemon, germinating in the house.  Reading another guide, I also have four lemon seeds potted and in the grow box. I have done the same with the Kiwi seeds and these are currently also germinating. I am hopeful they will start to sprout so I can transfer them to the soils and pots and go from there. 

I would love to end there but there is still one more. It is the last one, I promise! With Christmas time we had plenty of food to be eaten and lots of different fruit. This time it was the chance of the grapefruit. Now I could not find much on this but took a risk and potted it in soil and it also sits in what is now a very cosy grow box.

Now satisfied that I had enough trees, seeds, and cuttings growing or germinating (hopefully) it was time for me to look into what were the optimum conditions for them. I know my Bonsai likes a temperature no lower than 15 degrees centigrade and up to warmth's of 30 degrees centigrade but that would be a struggle.  I know they like humidity

Operation Grow Box 2.0!

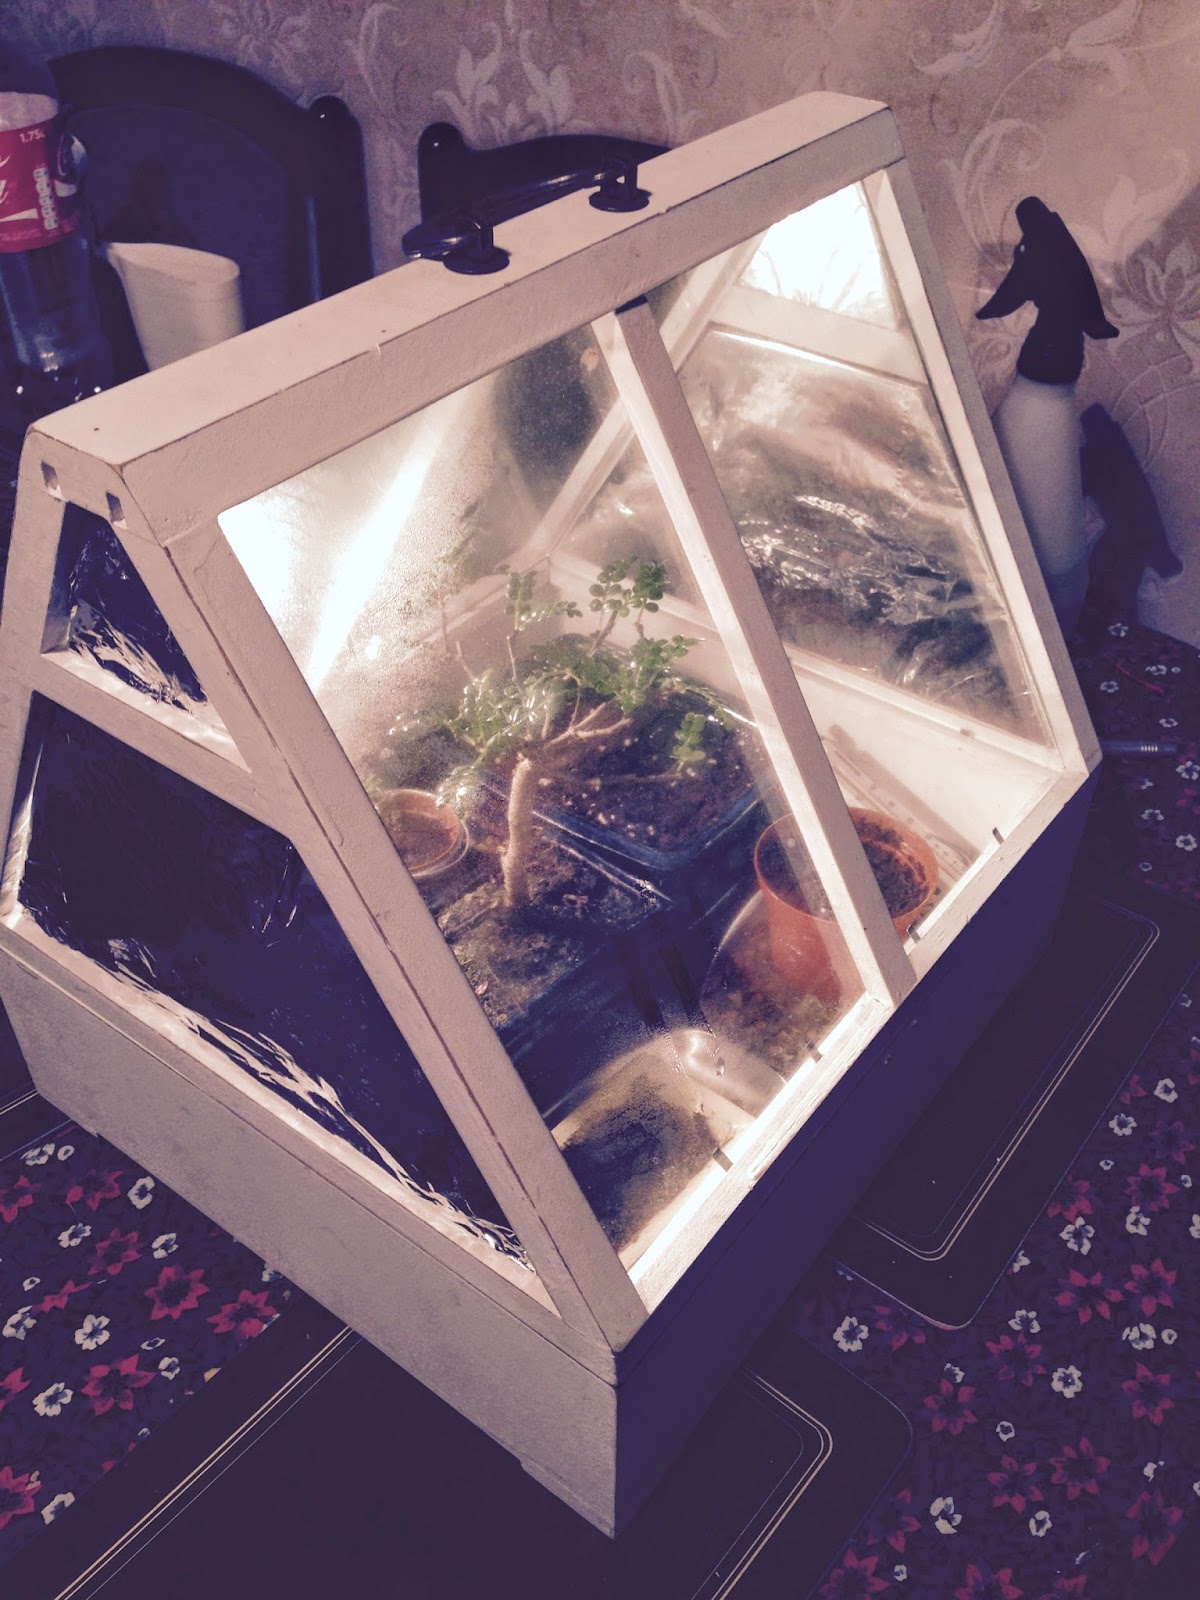
There is too much to say about what I have done to the grow box and what is still going on in this post. But I will write up and add a new post on this shortly. Below you can see the photo of my new pots, seeds, tree and cuttings in the grow box prior to the upgrade.


Grow box with lid open. Top right: 4 planted Lemon Seeds, Bottom Right: 1 Fukien Tea Tree Seed, Bottom Right: 3 potted cuttings from 5 year old Fukien Tea Tree and Middle/Centre/Top Left: My Fukien Tea Tree Bonsai.


Introduction

Hello and welcome to Beginning With Bonsai. I am am a complete amateur when it comes to Bonsai but it has always been something that interests me.  I received my first tree on Christmas day and have been researching and pretty obsessive since. Here I will produce regular updates on everything I have done with my new Bonsai and some other experiments I have got going in conjunction. I will post as regularly as possible with photos as well.

My Bonsai - Fukien Tea Tree (Carmona MicroPhylla)

Apparently one of the harder Bonsai Trees to master the Fukien Tea Tree can come in different varieties of leaf size. My one is the smaller variety with little leaves. The tree is known to blossom with flowers that turn into cherries/fruits making them a popular choice among Bonsai enthusiasts. The tree I received was purchased from a local garden centre and was 5 years old.

Instantly, I jumped online looking at what to do with my new Bonsai. Knowing it can be cut/pruned/manipulated I was looking at how I wanted my tree to look, rather neglecting the idea of everything else. For instance, the Fukien Tea Tree prefers warmer temperatures and good humidty. Here in the UK, in the middle of winter even the house temperature drops quite a lot and humidity is no where near where it should be. 

This prompted so much research my eyes stung from staring at my screen and my own visit to the local garden centre.  I know what I needed:

  • Bonsai Feed - to be used once every 1/2 weeks to help growth.
  • Grow box - I wanted/needed to put my Bonsai where I could monitor the temperature better and try and raise the humidity.
  • Bonsai clippers/scissors - For shaping, training and looking after my tree.
  • Bonsai Book - I had read a lot online but for some reason I felt a physical book could be the backbone to my Bonsai learning.
Lucky for me, I found the perfect pack - all for under £15.  The scissors, Bonsai feed and book cam together as a mini collection. The grow box I decided upon was made of wood, with 2 large windows divided into 2, and 2 side windows split with a small and large section.  Having sustained some water damage in storage it was available very cheaply. 

You make think that this was enough for me, but it wasn't.  I had my tree, had my scissors, a book and somewhere to keep my plant but as more and more research showed I needed to keep doing more.  This is where I will leave the introduction now. The first few photos I took of my Bonsai can be seen below with further pictures of the now upgraded and improved grow box and other surprises to come soon. I have had the Bonsai a week and while not much has changed in its appearance, nothing has got worse and it is still look healthy. Wish me luck!!!


1st Photo of my new Fukien Tea Tree (5 Years Old) - Excuse the distracting/messy background.